Friday, May 10, 2013

The Bumbo Floor Seat and Tray


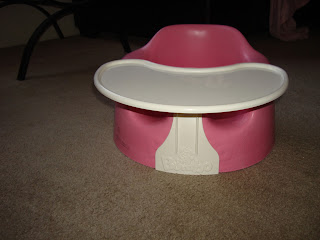
I wanted a Bumbo floor seat even before Savannah was born. I finally got one a couple weeks ago as a gift from my mother. I also got a Bumbo tray. These items are perfect for babies around the age of 3-7 months depending on when they start to hold their heads up and when they start sitting up.

Bumbo is a company that specializes in products that will heighten your child’s development. Their Bumbo floor seat is for babies who can hold their heads up but cannot sit up yet. It is designed in a way that supports the baby up into a sitting position so they can see and interact with their surroundings. The Bumbo tray attaches to the floor seat so the baby has an easy way to reach their toys.

There are a few things that I like about these products. First of all my baby girl loves them! She is always excited when I put her in the seat and she can sit up and look straight at me at the same time. Also I like how the seat is made of foam, when I saw these seats in pictures I always thought they were plastic but foam is obviously more comfortable than plastic. The tray is such a great accessory to the seat because it is easy to put together and put on and it makes play time a lot easier.

The only down that I can think of about these products is the price of the floor seat. It is only $50 but when you are in your early 20s, 2 years into your marriage, still in school and have a baby $50 is a lot to spend on a luxury item.

Even though it is over my budget I would highly recommend that anyone who has a baby who can’t sit up yet or who is expecting that they should purchase, or ask for, a bumbo floor seat and play tray.

To check out Bumbo's other products go to Bumbo.com and to buy their products in the US go to keendistribution.com/

Look at how much fun Savannah is having with her Bumbo floor seat and tray!
Wednesday, May 8, 2013

Knox Blox

This is so Easy and such a fun treat for kids and adults! A year or two ago when I was in Idaho at school I made these and my husband's brother and friend came over for dinner and they tried them and the whole pan was gone before they left and before they left they got some jello and knox mix from our cupboard so they could make their own.


Ingredients:  (I made two different kinds so you won't need as much as I have pictured above)
-One box of 6 oz jello or two boxes of 3 oz jello
-2 packets of knox mix
-Water


Pour the jello powder and the knox mix into a bowl and mix together. Boil 2 1/2 cups of water and pour into the powder mix and whisk as you pour or soon after.


Pour into a cake pan and put in the fridge until firm, about two hours.

Take out of the fridge and cut up into blocks or shapes or just rip pieces off as you go, whatever you prefer. 
I ended up making raspberry and lemon flavored knox blox and I usually make those flavors or lime but you can make any flavor you like!

Steps:
1. Mix together the Jello powder and the Knox mix.
2. Boil 2 1/2 cups of water.
3. Mix water and powder.
4. Pour into a cake pan.
5. Put in fridge until firm.
6. Cut up and serve.

Comment below if you have ever made or had knox blox. Do you like them? What is your favorite flavor?


Monday, May 6, 2013

Announcements and Invitations Deal


Do you want super cute and inexpensive announcements or invitations? If you do I know where you should go to get them! My cousin Mackenzie of course!! She made a super cute baby shower announcement for her sister and it turned out so well!!

She is only charging $10 for Baby shower, bridal shower, graduation, baptism, baby announcement and $15 for wedding announcements.
She will design the announcement or invitation and send you the finished product and all you have to do is order more copies from Walmart which is also inexpenzive. This is a really good deal for a really good product.

Check out how to set up something with Mackenzie at her blog, http://thestillsmallhome.blogspot.com/2013/04/announcement-and-invitations.html

Here is the baby announcement she designed! Isn't it super cute?
 

Saturday, May 4, 2013

Savannah Update!


We went to Savannah's 4 month check up a couple of weeks ago and we found out how much she weighs! She is 25 inches and weighs 15 1/2 pounds. She is in the 90th percentile for her height and the 70th percentile for her weight! Daddy was happy to hear that he contributed at least one thing to our baby haha since we pretty much is my clone!

Savannah has been and still is such a happy baby. She has started to try to roll over in the past month and it is so fun seeing her get closer and closer. She is also getting so good at grabbing things and pulling them to her mouth. One of my new favorite things to do with her is to try to get her to laugh and although she dosen't laugh a whole bunch it is worth the wait when she finally does laugh.

Savannah is growing up so fast and it is so fun to see her learn new things and just become more independent and it is also sad to know that she is starting to need me less and less but I know that there will always be time when she will need my help! I love her so much! She is the cutest baby ever!


Thursday, May 2, 2013

Spring Mod Podge Craft

My mom came over yesterday with this craft and I am so happy that we got to do it together because it was so much fun and it is so cute! This craft is fairly easy but it is time consuming, especially when you have a baby who needs a lot of your attention all of the time but I eventually ended up finishing it and I love what I got.


Supplies:
-Wooden Letters (We got our from http://www.thoughtsinvinyl.com/wooden-letters.html?p=1)
-Glue Gun
-Scissors
-Acrylic Paint
-Sponge Brush
-Mod Podge
-Sand Paper
-Craft Knife
-Cutting Board
-Pencil
-Craft Paper

First pick out the different colored papers you want for each letter and shape. Then trace the letters and shapes (My mom and I put a different colored paper on each side of the base of the bird) on the paper you want, this does not have to be perfect because you will be cutting off the edges with the knife after you glue on the paper.


Now cut out the letters.


Use the knife to cut out any shapes that have a hole in the middle like the P and R.


Paint the Sides and back of the letters, also don't forget to paint the insides of the letter.

After the paint has dried double check that you have painted all of the letter that you need to paint because if you have not it will be hard to go back and paint it after these next steps. After you have checked the paint you are now going to start putting the paper letters and shapes onto the wood letters and shapes. Brush mod podge on the wood letter or shape on the front side and stick your paper letter on top and put it aside while you do the rest so that it can dry.

After the mod podge has dried you are going to use the knife to cut down the edges. 


You can also at this time sand the edges to give it more of an antique look but I didn't sand mine too much because I was too scared that it was going to rip the paper.

Now brush a final coat of mod podge over the top to make a seal.

After the mod podge dries on the bird and the wing you will now glue the wing onto the bird with the hot glue gun.

Put the pieces together, in the spring one you only need to put the bird together, and set it up somewhere in your house and you are done!

This one is mine!

  This one is my mom's!

Steps:
1. Trace the letters and shapes.
2. Cut out the letters and shapes.
3. Paint the letters and shapes.
4. Put the paper letters and shapes on the wooden letters and shapes with mod podge.
5. Let them dry.
6. Cut off edging.
7. Brush mod podge over the tops of the letters and shapes.
8. Glue the wing onto the bird after the mod podge has dried.
9. Set it up somewhere cute in your house.

This was so much fun and I hope you enjoyed seeing how it is done! If you decide to try this out after reading this let me know in a comment below.

Happy Spring!