Showing posts with label Craft/DIY. Show all posts

Thursday, February 19, 2015

Crushed Jolly Ranchers for Cute Dessert Toppings

Let me just start by saying that I love play dates. Why? Well it is because play dates mean I get to talk to moms who understand what I am going through and I get at least an hour where I get to talk to people who can form whole sentences before my husband gets home from work. This past year I have made a lot of new mom friends during play dates and I have been loving it!

One of the play dates my daughter had last year was one right before Halloween to decorate sugar cookies. We all met at the park, because we live in Georgia and it is still 70 degrees out in the middle of October, and we all brought something to help with the cookie decorating. I had signed up for candy and the morning of I scrambled around my kitchen trying to find something that would work and I found Jolly Ranchers.

I thought it might be silly, and probably a risk of breaking teeth, if I left them whole so I tried to break them up. First I tried putting them in a plastic bag and hitting them with the handle of a whisk but I just ended up with some jolly rancher dust and a bag full of holes. This obviously was not working so I whipped out Pintrest on my phone and found the perfect way to get crushed pieces of jolly ranchers without making a huge mess.

Supplies:
  • Jolly Ranchers
  • Non-stick Baking Sheet or Parchment Paper or Cooking Spray
Directions:


1. Unwrap the Jolly Ranchers and place on a baking sheet that has been sprayed with cooking spray, has parchment paper lined on it or is non stick. (I used a silicone liner)

2. Preheat the oven to 275 degrees.

3. Bake for 7-8 minutes.


4. Let them sit for about 5 minutes, until the start to harden.

5. Break them apart with your hands.

That's it! So simple and it was very quick and the kids loved them! They would also look great on top of cupcakes.

What are your favorite toppings for sugar cookies?

Wednesday, February 11, 2015

Baby Feet Heart Plaque

 
My favorite type of crafts are ones that I can use my children's handprints or foot prints in, like my Child and Parent Handprint Plaque Craft from a couple years ago. Now that I have a new baby and it's almost Valentines Day I thought it would be the perfect opportunity to do one of these crafts for the first time with my new baby and his big sister! This time though I decided to go with a foot print craft since I have not done one of those yet. This craft turned out to be so simple, besides the baking it only took about 10 minutes to do and I was able to involve my two year old in making them and she had a lot of fun!

Supplies:
  • Salt
  • Paint (any color(s) you want)
  • Paint Brushes
  • Flour
  • Water
  • Mixing Bowl
  • Mod Podge
  • Rolling Pin
  • Heart Cut Outs (not pictured above)
  • Ribbon (If you choose to hang up your plaque(s))
  • Parchment Paper

And you will need at least one cutie and if you are as lucky as me than you have two cuties!

Directions:


1. Make the salt dough.
  • 2 Cups Flour
  • 2 Cups Salt
  • 1 Cup Water
Mix the above ingredients together in your mixing bowl with your hands. Add more water if it is too dry, add more flour if it turns out to be too wet.

2. After making the dough if you are going to make more than one plaque than separate the dough into how many portions you will need. I was able to get enough dough for my one month old and my two year old with enough dough left over to make another small plaque. If you are planning on making more plaques than three small ones then you should make more dough.


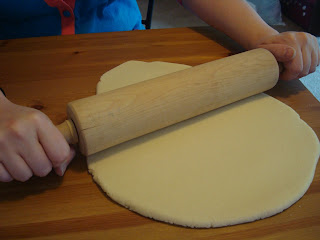
3. Roll the dough out on parchment paper.


4. Print out a heart on a piece of printer paper and cut it out, making sure it will be big enough to fit the foot prints. Place it over the rolled out dough and cut out with a knife, pulling away the excess dough when done. (The above doesn't have the parchment paper because this was before I knew I should have used it in the first place because if you don't it is impossible to pick up the dough without ruining the heart shape it will be in.)


This is what it will look like.


5. Have your child step on the dough heart and push their toes and feet down so you can make sure you get a good imprint of their feet. Fill in any holes that may happen with some of your left over dough and rub down with water so the new dough will blend in. At this point you can also poke a hole into the dough with a straw so later you can hang it up with string.


6. Bake at 170 degrees for 2 hours on each side, I flipped them because the bottom was not drying.


When they are done drying in the oven they should look something like this.


7. Let cool and then apply a layer of mod podge.


8. Paint the plaque any color after the mod podge has dried.


9. After the paint has dried apply one more coat of mod podge. This will give the plaque a shiny look to it.

10. Let dry and you are done!

I love the way it turned out and I love that I have these great family keepsakes so when my kids keep growing and get way too big for being my babies I can look at these and be reminded that they are and always will be my babies no matter how big they get!

Happy Valentines Day!


Wednesday, February 26, 2014

Snowman Winter Craft

I wanted to post this before Winter was over. It is actually a gift I made for a Christmas exchange that the women in my family do on Christmas Eve but I think it is something that could be put on display or given as gifts all throughout winter since they are snowmen and it snows on more than just the holidays.


I'm sorry for the blurry picture above, it is the only picture I have that really shows all the parts of each snowmen but I will have a clearer picture below, it just doesn't show the tops of the snowmen as well as I would like to show you before the instructions.

For the ones I made, I did one with hot chocolate and marshmallows, black buttons, red fabric and black ribbon. The one in the middle was for my aunt Tina, she is allergic to chocolate so I wanted to make one that she could enjoy and we had a lot of candy left over from Savannah's party. I found enough to make this one with lemon heads, broken up pink and white candy canes, pink buttons, striped fabric and yellow ribbon.

Supplies: (To make one snowman)
  • 2 baby food jars
  • 2 hot chocolate packets (or lemon heads or anything sweet)
  • mini marshmallows (or something that will go with what you want for the other jar like another candy)
  • fabric (any color, this will be for where the red is and the striped fabric is on the above snowmen)
  • ribbon (A color that will look good with the fabric and food you choose, the above have black and yellow ribbon)
  • Two buttons (ones that will go with the color scheme that you have going on with the ribbon and fabric)
  • Hot glue gun
  • Orange and Black paint
  • Small paint brush
Directions:
  1. Take one of the baby jars, make sure you take off the label and remove the sticky residue from all the jars. I did this by dampening a paper towel a little bit with olive oil and resting it on the residue for a few minutes. Then the residue will be loose and easy to rub off with the same towel.
  2. Fill the jar to the top with hot chocolate, mine needed exactly two packets.
  3. Cut the fabric into a circle that will be able to drape over the top of the lid.
  4. Hot glue the circle fabric onto the top of the lid. I put hot glue on top and on the sides and pushed the fabric down.
  5. Cut off excess fabric. This gave the fabric on my snowmen as draped look to it.
  6. Glue the two buttons onto the front of the jar and put the lid back on.
  7. For the second jar you will paint on a face with black paint for the eyes and smile, I did dots for all of these, and orange paint for the "carrot" nose. I did the nose by dipping a corner of a paper towel in the paint and dabbing it on the jar, it gave me the shape of a nose that I was looking for.
  8. Fill this jar with the mini marshmallows.
  9. Cut out the length of ribbon you will need to make it around the lid. I found out what length I needed by wrapping the ribbon around the lid and then cutting the ribbon to the length I needed.
  10. Glue the ribbon around the edge of the lid. I liked how mine ended up looking like little Russian snowmen!
  11. Now I cut out small pieces and glued it on the top of the lids to cover the labels and silver.
  12. Put the lid back on and glue the marshmallow jar on top of the hot chocolate jar and you are done!
Of course there are many ways you can make these snowmen. You can even add other layers and have a three layered snowman with hot chocolate, marshmallows and candy canes or anything you want!

Here is the other picture I wanted to share:


Source

Saturday, November 23, 2013

Stain Removal!

This tip has saved my husband and I from hideous carpet stains so many times this year from diaper blowouts to juice spills! The first time we used this stain removal technique was after a disgusting blow out...


Sorry for the graphic photo but I think you need to see it to understand how horrible the stain was!

Well this stain removal trick that I am about to show you was the reason that we no longer have a blob of green on our carpet!

The stain that I got to remove from the carpet was a dark purple grape juice stain. When this incident happened Savannah and I were home alone as we often are since Ryan works 5 days a week but I had gotten myself a glass of grape juice and put it down on the coffee table, mistake number one, and as I  turned my head away for one second, mistake number 2, I hear glass hit glass and then I hear liquid pour and start dripping onto the carpet. I turn my head around and there was the scene of the crime!


As soon as I saw it I was freaking out! I had no idea what I should do but I had remembered the awful stain that Ryan had been able to get up so I called him right away and he told me that the answer was beer!

We do not drink alcohol so us having beer in the house is not a normal thing but in Brazil they use beer a lot in their cooking and baking and Ryan loves to make Brazilian food so that I can try it and so he can relive his mission years so we had beer in our house because he had used it for dinner one night and he had only used one of the 6 bottles so we still had 4 left, he used the second one for cleaning up the first stain.

So here are the steps to removing a stain with beer.

1. Dab up as much of the liquid as you can with paper towels.

2. After you have gotten as much of the liquid up you are going to pour the beer over the stain.
We used Bud Light Lime only because that was what was the cheapest when Ryan went to the store so I am sure any flavor or brand would do the job but I am also sure any of them will not make your carpet smell not so good because beer smells awful but the smell goes away pretty fast.

3. Let the beer sit for 5 minutes and then rub it with some wipes.

Now you should be done and the stain should be gone!


Before and After! What a change and it all only took about 15 minutes! I was so relieved when it worked! I was freaking out because I knew this would be the perfect reason for the manager of our apartment building to keep most, if not all, of our deposit when we move out!

Let me know if you have ever tried this or what other stain removal tricks you know!

Friday, August 16, 2013

Child and Parent Hand Print Plaque Craft!

I am so excited! I have been wanting to post this for a long time but I knew that it was going to take a long time to type out so I have been putting it off but I just reached 1,000 followers which makes me so excited so I decided as a gift to my readers I would put this fun post up no matter how long it takes me to type!

So I first saw this craft on my cousin's blog and I thought it was so cute so I saved the link for later use because I knew I wanted to make it someday with Savannah. Then Father's day was coming up and I decided that instead of doing this craft for a mommy and me project I decided to do it as a father's day gift because I knew it would mean a lot to my husband but of course this can be done for any reason even just as a project.

Here is what you will need:

-Flour
-Salt
-Water
-2 or 3 Colors of Paint
-Modge Podge
-Small Paint Brush
-A Bigger Paint Brush
-Pencil Eraser
-Ribbon
-Rolling Pin
-Something that is big and square

First you are going to make the plaque out of salt dough. 

Ingredients for Salt Dough:

-2 Cups Flour
-2 Cups Salt
-1 Cup Water

Directions for Salt Dough:

-Mix all of the ingredients together.
-If it is too sticky than add more flour and if it is too dry than add more water.

Now roll it out.


I rolled it out so that it would be big enough for me to fit my hand in it and still have room to add writing above it.

 Now try to find something that is big and square. I used a salad plate that I had in my cupboard. You are going to use this to cute the dough into a square so it needs to be big enough to fit your hand and writing.


An extra step that you can choose to do or not to do is to take a paint brush and dip it in water and brush the edges of your dough to make it smooth.


Next is the tricky part depending on how old the baby or child is that you are going to do this project with. When I did this I did it with my 5 month old daughter so I had my mom help me because I knew she would just try to squish the dough in her hand as soon as I put it down.


So first you will put your hand down into the dough. Do it hard enough so you can see your hand but not so hard that your child is going to push through the dough. Next help your child, if they are too young to do it on their own, put their hand print in the middle of your hand print. It should end up looking something like this:


Now Punch two holes in the top corners for where you are going to put the ribbon through, or you can put it on a stand if you prefer that, but make sure the holes go all the way through. Mine didn't but I was lucky that it was really thin and I could break through without ruining the whole thing.

Now you are going to bake it at 150 degrees for 3 hours. My cousin and I both bumped the heat up to 200 degrees for the last hour.

Now take it out and let it cool off. After it has cooled off brush modge podge over the top. I am not sure why you brush modge podge over the top here but I did and it didn't hurt it so why not?!?!


Now to my favorite part! First let the modge podge dry and then you can start painting. First paint the whole thing your base color. I chose cream.


Let that dry and then paint both the hands the color you want the big hand to be, I chose Pink!


Let that dry and then color your child's hand the color you want their hand to be, I did blue.


My daughter's hand was the hardest part to paint but I was able to make it look half way decent!

Now you are going to do the writing at the top with your small paint brush. I struggled with what I was going to write on the top for the whole week before I did it but I finally went with Daddy's Girls! You can obviously go with what ever you want like your child's name or Mommy and Me or anything you want!

After you have finished writing than you are going to go dot crazy! Take the pencil eraser and dip it in the paint and put dots all over! I put pink and blue dots all over!


Finally after all the paint has dried brush modge podge over the whole thing to make it glossy and shiny! Then tie the ribbon in it and hang it on a wall!

 
I was highly recommend giving this as a gift because my husband loved it and he said it was his favorite of all his gifts and he got some really good gifts but this one meant a lot to him!

Also head over to my cousin's blog to see how hers turned out!

I Love My Kid's Mommy and Me Plaque


Tuesday, May 14, 2013

"Football" Plastic Bags

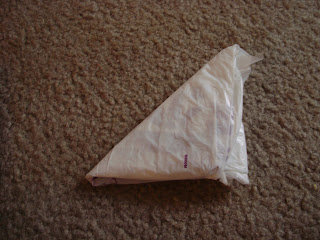
Do you have a huge stash of plastic grocery bags stashed somewhere in a huge pile? I did until I found this helpful hint of how to make those bags into small easy to store triangles or "footballs".


 First flatten your bag out.


Now fold in half.


 Fold in half again.


Now start your triangle at the bottom and work your way up to the handle.


Stop when you get to the handle.


Fold the handle in half.


Tuck the handle into the triangle.


Now do it again and again and again until you have done them all!

This is super easy and saves up a lot of space!
Where are you going to put your new plastic "footballs"? Let me know in a comment below!

http://mousechirpy-polkadotpineapple.blogspot.com/2009/03/grandmothers-apron-carryall.html

Thursday, May 2, 2013

Spring Mod Podge Craft

My mom came over yesterday with this craft and I am so happy that we got to do it together because it was so much fun and it is so cute! This craft is fairly easy but it is time consuming, especially when you have a baby who needs a lot of your attention all of the time but I eventually ended up finishing it and I love what I got.


Supplies:
-Wooden Letters (We got our from http://www.thoughtsinvinyl.com/wooden-letters.html?p=1)
-Glue Gun
-Scissors
-Acrylic Paint
-Sponge Brush
-Mod Podge
-Sand Paper
-Craft Knife
-Cutting Board
-Pencil
-Craft Paper

First pick out the different colored papers you want for each letter and shape. Then trace the letters and shapes (My mom and I put a different colored paper on each side of the base of the bird) on the paper you want, this does not have to be perfect because you will be cutting off the edges with the knife after you glue on the paper.


Now cut out the letters.


Use the knife to cut out any shapes that have a hole in the middle like the P and R.


Paint the Sides and back of the letters, also don't forget to paint the insides of the letter.

After the paint has dried double check that you have painted all of the letter that you need to paint because if you have not it will be hard to go back and paint it after these next steps. After you have checked the paint you are now going to start putting the paper letters and shapes onto the wood letters and shapes. Brush mod podge on the wood letter or shape on the front side and stick your paper letter on top and put it aside while you do the rest so that it can dry.

After the mod podge has dried you are going to use the knife to cut down the edges. 


You can also at this time sand the edges to give it more of an antique look but I didn't sand mine too much because I was too scared that it was going to rip the paper.

Now brush a final coat of mod podge over the top to make a seal.

After the mod podge dries on the bird and the wing you will now glue the wing onto the bird with the hot glue gun.

Put the pieces together, in the spring one you only need to put the bird together, and set it up somewhere in your house and you are done!

This one is mine!

  This one is my mom's!

Steps:
1. Trace the letters and shapes.
2. Cut out the letters and shapes.
3. Paint the letters and shapes.
4. Put the paper letters and shapes on the wooden letters and shapes with mod podge.
5. Let them dry.
6. Cut off edging.
7. Brush mod podge over the tops of the letters and shapes.
8. Glue the wing onto the bird after the mod podge has dried.
9. Set it up somewhere cute in your house.

This was so much fun and I hope you enjoyed seeing how it is done! If you decide to try this out after reading this let me know in a comment below.

Happy Spring!